Friday, November 10, 2006

D is for...

D is for Dog. Hot Dog!
Who: The Hot Dog.
What: Most hot dogs are made from lightly seasoned beef or pork. There are also chicken, turkey and vegetarian dogs too.
When: The hot dog was invented in the 17th century in Germany. Today, they are a staple of summer - sports games and backyard barbecues.
Where: They became popular in North America in the late 1800's, known as Frankfurters. The name "Hot Dog" became popular in the 1890's.
Why: Shockingly, Hot Dogs don't really provide your body with any nutrition. An Oscar Mayer Beef Frank - alone, with no bun or condiments contains 140 calories, 13 grams of fat and 460 mg of sodium per dog.

In Europe in the mid 1800's people said that trucks roamed around cities collection stray dogs that were then taken to factories and ground up to make the sausages, and they were called "Dog Sandwiches".

The debate rages on as to what are "acceptable" toppings for hot dogs. Some insist it's mustard only. For others it's Sauerkraut. Chili and cheese? Relish and onions? Ketchup and pickles? Plain? Pick your favorite.

We have two "gourmet" hot dog shops in Calgary and recently Scott and I checked out Le Chien Chaud. We tried two dogs - the Mexican and the French.
The Mexican Dog was loaded with mustard, salsa, ground hot peppers and cheddar and topped with a sprig of cilantro. This is a dog not for the faint of heart - this bugger was spicy!!! We had a hard time finishing it.
The French Dog was divine. Dijon mustard, sauteed mushrooms and Gruyere cheese. Very very good.


How can you talk about hot dogs and not mention Corn Dogs? Make your own corn dogs at home - go here. Link to Food and Wine site via Nosheteria.

Beaners and Wieners for Grownups
1 can brown beans
2 hot dogs sliced into rounds
hot sauce to taste
3 tb smoky bbq sauce, or to taste

In a small pot over medium heat combine the beans and hot dogs. Add the hot sauce and bbq sauce and heat until the hot dogs are hot. Check seasonings and add more hot sauce, bbq sauce and salt and pepper as needed.

Wednesday, November 08, 2006

Spotlight On - Baking: From My Home To Yours

There are some people in this world who would laugh themselves into a coma if they knew that I was hosting a spotlight to review a cookbook on baking. I am intimidated by baking; it is not known to be one of my strong points. I've got about 3 desserts that I can make no problem. If I'm asked to bring a baked item to a lunch or dinner, you can bet it will be one of those 3. Ditto if someone is having a birthday or any sort of celebration. Fortunately all three desserts are really good, but I think my friends, family and co-workers are probably getting tired of them. Well, the times are a changin'. For the better!

When I got my copy of the ginormous Baking: From My Home to Yours by Dorie Greenspan from the wonderful people at Houghton Mifflin Company, I wondered what I had gotten myself into. There's no way I'll be able to make any of this! was the first thought in my head.

I am glad to say I proved myself wrong.

I have fallen head over heels for this book and I am feeling much more confident about baking than I ever have before. I think this is a book that anyone with any level of cooking experience from novice to expert would enjoy. There are recipes in here for everyone, from simple to more difficult and dramatic.
The book is divided into 6 sections: Breakfast Sweets, Cookies, Cakes, Pies and Tarts, Spoon Desserts and Base Recipes. All of the 200 plus recipes have both serving and storing tips, all very helpful. Many of the recipes have "Playing Around" tips too, to vary the recipe. Instead of making the delicious looking Cranberry Upside-Downer Cake, you could change it to a Summery Peach Upside-Downer with just a few tips from Dorie.

All the recipes are informative and thorough. As a fairly novice baker I appreciated the tips that are sprinkled in the recipes, letting you know if a dough will be thick or thin, if a cookie dough will or will not spread while baking, or why a mixture may look curdled during the preparation. Very helpful information for all bakers.

There are some truly gorgeous pictures in this book, but be warned; not all recipes have a picture to accompany it. In most cases I don't think this is a problem (although I did run into trouble on my last recipe).


Savory Corn and Pepper Muffins.
These are probably the best corn muffins I've ever had. As spicy as you want to make them, a bit sweet and lots of corn, cilantro and peppers.
Coco-Nana Bread
Was the biggest hit at my office. A lovely color with lots of chocolate throughout, nice and moist. Make sure you are a banana fan; these were a little too heavy on the banana for me, even with all the chocolate.
Brownie Buttons.
Scott chose this one, I am not a real brownie person. These could convert me though. I loved the orange zest and the white chocolate on top. The recipe was simple and took no time to get together.
My hands down favorite was the Fresh Mango Bread. I love mangos but have never had them in any sort of baked good before. This was GOOD. The mango flavor was subtle but there and the ginger and lime added a nice kick. I didn't want to share this one with my testers, but they pried it out of my hands anyway.

Buttery Jam Cookies (made with Lingonberry Jam).
This was the most disappointing to me, not because of the taste - they were very good - because of what they looked like. As I pulled the first sheet of cookies out of the over I couldn't help wondering if I had done something wrong. Were they supposed to look like little pale lumps? This was the only time I wished I had a picture to look at. I'm sure Dories' Buttery Jam Cookies don't look like this!


With absolutely no hesitation I can say that I recommend this book to anyone who likes to bake or who wants to start. Dorie has written and co-written 9 books with the likes of Julia Child, Daniel Boulud and Pierre Herme. How can you go wrong?

Fresh Mango Bread
From Baking: From My Home To Yours by Dorie Greenspan

3 large eggs
3/4 cup flavorless oil, such as canola or safflower
2 1/2 cups all purpose flour
1 cup sugar
1 tsp baking powder
1 tsp baking soda
1 1/2 tsp ground ginger
1 tsp ground cinnamon
1/4 tsp salt
1/2 cup packed light brown sugar
2 cups diced mango (from 1 large peeled and pitted mango)
3/4 cup moist, plump golden raisins
grated zest of 1/2 lime

Centre a rack in the oven and preheat the oven to 350'. Butter an 8 1/2 x 4 1/2 inch loaf pan, dust the inside with flour and tap out the excess. Put the pan on an insulated baking sheet or on two regular baking sheets stacked one on top of the other.
Whisk the eggs and oil together.
In a large bowl, whisk together the flour, sugar, baking powder, baking soda, spices and salt. Rub the brown sugar between your palms into the bowl, breaking up any lumps, then stir it in. Pour the wet ingredients over the dry, switch to s sturdy rubber spatula or wooden spoon and mix until blended. The batter will be very thick (really more like a dough than a batter) and not easily mixed, but persevere, it will soon come together. Stir in the mango, raisins and zest. Scrape the batter into the pan and smooth the top with a rubber spatula.
Bake the bread for 1 1/2 hours, or until it is golden brown and a thin knife inserted into the centre comes out clean. (If the bread looks as if it's getting too brown as it bakes, cover it loosely with a foil tent.) Transfer the pan to a rack and cool 5 minutes before running a knife around the sides of the pan and unmolding. Invert and cool to room temperature right side up on the rack.

Ernest Hemingway

When Scott and I got married one of the gifts we received was a gift certificate to a restaurant on 17th Avenue called The Sultans Tent. We had an absoltely terrific dinner there and one of my favorite parts was my drink (surprise, surprise). The waiter called it an "Ernest Hemingway" and it was crushed mint, rum and coke. It was very delicious.

Sadly the restaurant is no more, which is really a shame. But I've got a huge mint plant in my front yard so don't cry for me.


Ernest Hemingway

Small handful mint leaves
Ice
Rum
Cola

Wash mint leaves and place in a glass. With a muddler or spoon, gently crush leaves to release their oil. Add ice, one ounce of rum and top the glass up with cola.

Drink with someone you love. Or like.

Tuesday, November 07, 2006

Pavani's Curried Koftas


Fantastic recipe alert!

Last week when I saw Pavani's Kofta Curry dish over at Cooks Hideout I knew I had found that night's dinner. It was fairly easy to make and I had all the ingredients (but the paneer) already at home. Within an hour of getting home Scott and I sat down to a fantastic meal of Kofta and Naan (Scott had rice too). The panfried kofta smelled amazing and tasted even better. And the sauce was so good that Scott actually licked his plate! (Don't tell him I told you!)
This dish gets a huge thumbs up and we'll be having this a lot this winter. Thanks Pavani!

Monday, November 06, 2006

Weekend Cookbook Challenge #10 Neglected Gadgets Round Up

Ricotta Waffles from Haalo at Cook Almost Anything At Least Once.

Round-up for WCC 10 is up!

Click here to go to the WCC site, or click here to go directly to this month's co-host's (MARY!) page.

Hope to see you all at #11!

Friday, November 03, 2006

C is for...

C is for Carrot.
Who: The Carrot.
What: Root Vegetable, scientific name Daucus Carota, which has been traced in writings to the 3rd century. Carrots belong to the Umbelliferae family which also includes Parsnips, Cumin and Dill.
When: Carrots can be planted in early spring, as soon as the soil is thawed.
Where: Anywhere! Carrots are one of the easiest vegetables to grow.
Why: Carrots are very rich in anti-oxidants, and are the best vegetable source of Vitamin A. They are full of Beta-Carotene which helps your vision. The nutrients in Carrots also promote Colon and Lung health.

Carrots can be purchased fresh, frozen and canned. Carrots can be eaten raw or cooked, and are actually better for you if eaten cooked. Carrots are commonly used in salads, stirfrys and stews.

Did you know? Baby or Mini Carrots sold in bags in the grocery store are not baby carrots at all. They are fully grown carrots that are either broken or deformed that have been peeled and formed in to a small carrot shape.


Carrot Patties

1 cup shredded carrot
1 cup shredded potatos
1/4 of a red onion finely chopped
1 garlic clove minced
1 egg, beaten
2-4 tb flour
salt
pepper
oil for frying

Squeeze as much moisture out of the potatos as you can, then mix the carrots, potatos, onion and garlic together. Add the egg, mix well, then add flour to bind. Season with salt and pepper.

Heat 1 tb of oil over medium heat. Drop the carrot mixture by large spoonfuls into the pan and press down slightly to flatten. Cook for 5-6 minutes on each side until golden brown. Repeat with the remaining batter and serve straight away.

Curried Carrots
It doesn't get much easier than this, but what a dish! Goes super with roasted chicken and potatos.

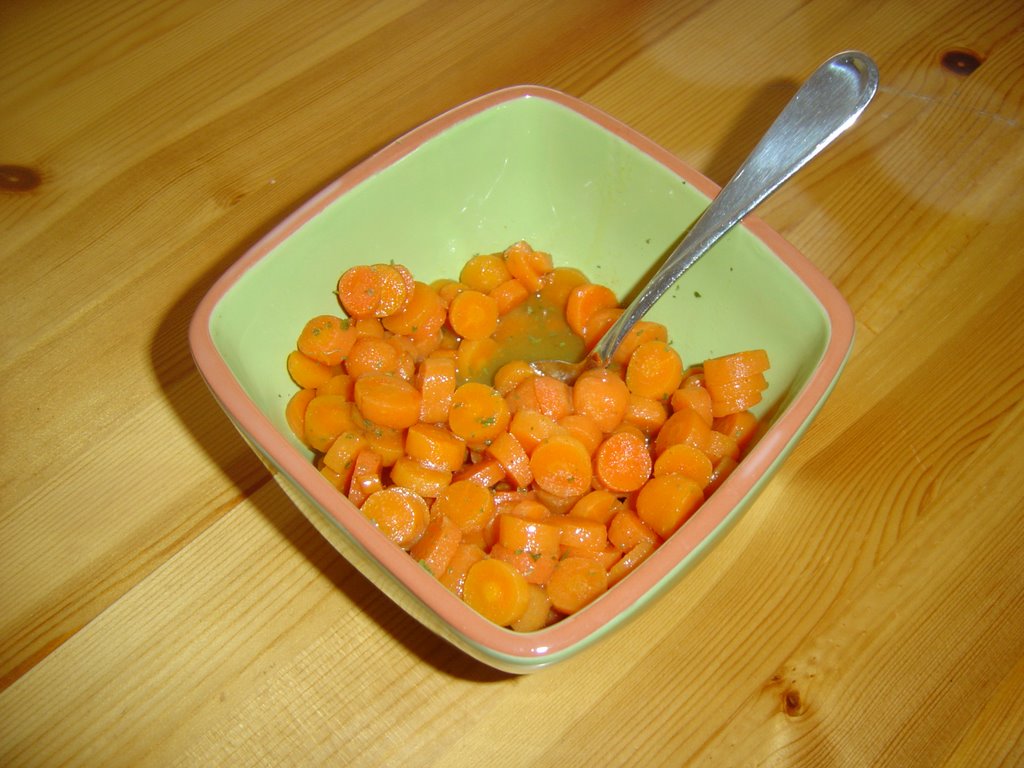
Slice some carrots into rounds. Steam until tender. Pour into a bowl. In a separate bowl, stir together very soft or melted butter, honey and curry powder. Pour over the carrots and stir gently. If you have some parsley, chop it up and add it in.


Avert your eyes! It's NUDE MAN CARROT!

Previous Alphabet Posts:
A is for...
B is for...

Wednesday, November 01, 2006

Happy Halloween!!!!

ARGH! I've been trying to get this together since yesterday morning. Blogger why do you vex me so?
Anyhoo, hope you all had a good Halloween. We did, we had more kids than last year, but still not a lot.

Since last night was spent standing at the door handing out candy to the little ghosties and goblins, we had our Halloween fun on Monday night.

Here's our 2 indoor Halloween decorations:
This is the Haunted Mine. The little cars move around the track and there's lots of scary music.
This is the Haunted Tree House. Spooky!

Monday night before dinner we carved our pumpkins:
I'll warn you now. If you are expecting to see well carved pumpkins, you are going to be sorely disappointed.
This is my "TRICK" pumpkin with a strobe light inside.
And my sweet little white pumpkin, which was a real b**ch to carve.
Scott's pirate pumpkin,
and the one he sprayed silver.

We also had a spooookey dinner. We had salad with green guts dressing, shredded brain and witches fingernails:

And BAAT sandwiches (Bacon, Avocado, Alfalfa sprouts and Tomato):

For dessert: Tarantulas!!!!!

I toasted pumpkin seeds for the first time in years. I sprinkled them with salt and cayenne pepper and roasted them for about 45 minutes at 300'. Yum.

Monday, October 30, 2006

Books of the Month

Last month I was spoiled! beyond belief. Look at all these wonderful books:
Top Row Left to Right:
The first one is a small book called Pot Pies:Forty Savory Suppers. I bought it at a garage sale for a quarter. Now that the weather is crap and it's snowing here I'll have to start reading it. Next is The Nasty Bits, Scott bought it for me for my birthday. I just started reading it and so far it's pretty good. Next to that is a book I bought used Laurel's Kitchen Recipes and next to that is Rachel Ray's 30 Minute Get Real Meals. I also got that one for my birthday after I went on a (drunken) rant one night about how I like the idea of Rachel Ray, but she is just a bit...much for me to watch on TV. I have a mini-review of this book planned; we had company a couple of weekends ago and I cooked a bunch of food out of it.
Next Row: 2 more presents: Vegan Freak and Vegan with a Vengeance. I haven't started to read Vegan Freak yet, but I am drooling over quite a few recipes from Vegan with a Vengeance. Especially the cupcakes. Next is another gift (i told you i got spoiled) Feast, which I haven't looked at yet. And lastly, another used book Quick Vegetarian Pleasures
I have a lot of reading to do.

Friday, October 27, 2006

B is for....

B is for Beet.

Who: Beet.
What: Root vegetable, related to Swiss Chard.
When: Spring to Fall. Beets are tolerant of cooler weather, able to extend the growing season into the late Fall.
Where: Originally from Europe beets will grow almost anywhere, although they favor a cooler climate.
Why: The root (the most commonly eaten part) is high in Vitamin C, Fiber and Folate. The greens (best eaten from young plants) are high in Vitamin A.

Beets are commonly found in Borscht, pickled, canned and raw. Pickled Beets are eaten as a condiment. Raw Beets can be shredded into salads, boiled, steamed or roasted.


Roasted Beets

1 lb beets, tops removed and washed
olive oil
salt
pepper

Preheat oven to 350'. Scrub beets and cut off tops and bottoms. Place in a single layer on a large piece of aluminum foil. Drizzle with olive oil and season with salt and pepper. Wrap tightly in foil and bake for 1 hour or until beets are easily pierced with a sharp knife.


To Peel Roasted Beets

Cool roasted beets to room temperature. Using 3 or 4 paper towels (or a dish towel you don't care about wrecking) briskly rub the beets one at a time, until all the skin is rubbed off.


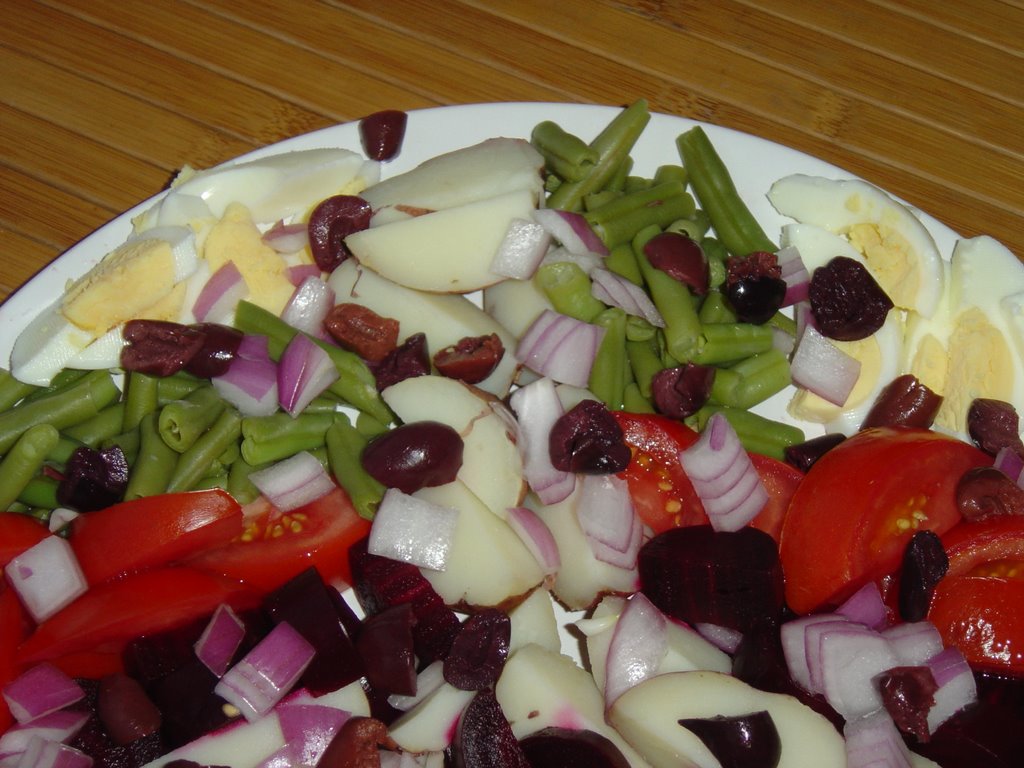
Vegetarian Salad Nicoise
4 servings

1 lb new potatos, steamed or boiled until tender
1/2 lb beets, roasted and peeled
1 lb green beans, steamed until tender-crisp
5 roma tomatos
1/2 red onion, roughly chopped
3 hard cooked eggs (optional)
1/2 cup nicoise or kalamata olives, pitted and halved

Dressing:

1/4 cup red wine vinegar
1 tb dijon mustard
1 garlic clove minced
1 tb olive paste
1/4 tsp pepper
1/2 cup olive oil

Cut the potatos and beets into chunks. Cut the beans into thirds. Wedge the tomatos and eggs.
Arrange all the vegetables and eggs if using on a large platter. Scatter the olives over the top.

Whisk all the ingredients for the dressing together. Drizzle the dressing over the salad and serve straight away.


Check out these links for other tasty beet recipes:

Sauteed Beet Greens with Lime and Garlic from Kickpleat at Everybody Likes Sandwiches.

Beetroot Cured Salmon from Haalo at Cook Almost Anything At Least Once.

Roast Beet Salad with Goat Cheese from Gabriella at My Life As A Reluctant Housewife.

And for fun...

Beet Marshmallows from McAuliflower at Brownie Points.

Wednesday, October 25, 2006

Pot Au Feu

I have always wanted to try Pot au Feu, with its frou-frou name and vegetables cut on the diagonal. How fancy!
It is also pretty healthy which is always a plus.


So here we have our veggies - 2 carrots, 2 celery, 1 1/2 turnips (they were sort of big) some leeks and a small zucchini.

I bought a pack of tenderloin steaks and browned them with some non-stick spray.

I added 4 cups of chicken broth, the veg, 2 cloves of garlic that I sliced in half, 2 sprigs of lemon thyme from the slowly dying plant on the floor, and some pepper.

Simmered it for 20 minutes, discarded the thyme and garlic, removed the steaks and sliced into thin strips. Then put a couple of pieces of steak in each bowl with some vegetables and broth.
It was just lovely, very flavorful and filling, but still a light meal that didn't leave us feeling weighed down.
Give it a try.

Tuesday, October 24, 2006

Thanksgiving Centerpiece

I know Thanksgiving was a couple of weeks ago, but I wanted to show you the centerpiece I made for the table:

BOO!

Monday, October 23, 2006

Weekend Cookbook Challenge #10 Neglected Gadgets

The tenth installment of The Weekend Cookbook Challenge is being hosted by Mary at The Sour Dough and she chose a fantastic theme - to use a neglected gadget/appliance in our kitchen.

This is a great theme because I doubt anyone out there doesn't have at least a couple of gadgets they bought with good intentions that got shoved to the side. I know I do. My kitchen and basement and full of them!

A while back I wrote about how much I hated my George Foreman grill until I grilled wraps in it. Turns out that the grill is a good panini maker, but I never used it again after I wrote that post.

Until the theme for WCC 10 was announced. Thanks Mary!

I chose to use a cookbook I've owned for only a short time; Simple Italian Sandwiches by Jennifer and Jason Denton and Kathryn Kellinger.

I am really enjoying reading this book. In addition to the panini's - of which they are many to choose from- there are condiments and sauces, salads, appetizers and non-grilled sandwiches. You don't have to own a panini grill (or any grill) to enjoy this book, although it would help.

I chose 2 sandwiches to make, the first was the Mozzarella, Basil Pesto and Peperonata Panini.
The sandwich is full of gooey melted cheese, homemade pesto, and homemade peperonata. I don't really like pesto much because most prepared pesto is made with pine nuts and I can't stand those things. For this recipe, I just omitted the pine nuts and increased the amount of walnuts slightly. I don't know if butter is usually an ingredient in pesto, but it was here. The pesto was very very good. I cut back the recipe as I was only cooking for two but I regretted that after I had tried the sauce. Delicious!
Scott had 2 panini - 1 regular and 1 with ham added. The ham one was mighty fine too.
Dessert was truly eye opening. Up until this dinner I had never eaten Nutella. That has changed, for I have seen the light and become a convert. That stuff is good. And it's even better when smeared between 2 pieces of white bread and grilled.

You sure don't need a recipe for that; if you have any kind of panini grill, george foreman grill or even a grill pan, you must try a Nutella Panini! Your life will never be the same.


Have you taken part in the Weekend Cookbook Challenge yet? There's still time! Email a link to your post to this month's host Mary at maryATbreadchickDOTcom by November 3. We'd love to see you there.

Friday, October 20, 2006

A is for....

Starting this week for 26 weeks, I am going through the alphabet food-wise.

Each week I'll do a post on a food or cuisine that starts with that weeks letter. How much fun with that be? Hopefully some. Let's find out.


A is for Artichoke.

Who: The Artichoke.
What: A leafy vegetable and a member of the thistle family.
When: Peak season is March thru May, but they are readily available year round.
Where: Louisiana and California grow almost all artichokes sold in North America.
Why: Artichokes are good sources of Vitamin C, Potassium and Folate. They are also fat free.

For years it seemed the only way artichokes were served was steamed whole, with butter or mayonnaise on the side for you to dip the leaves in. Now the hearts (the best part) turn up everywhere: salads, pasta, pizza, sandwiches; you are only limited by your imagination.

In addition to buying them whole, you are also buy artichokes canned, marinated in jars and frozen.

If you want to learn how to clean and cook artichokes, click here.

Artichoke Tartlets
Makes about 24
Adapted from City Palate Magazine

8 slices of bread
soft butter or margarine
1 large jar of marinated artichoke hearts
1/4 cup grated parmesan cheese
1/2 jalapeno pepper, finely minced
3 tb mayonnaise
2 tb lemon juice
salt and pepper

Cut 3 - 2" circles out the bread, giving you 24 total. Spread one side of each round with a small amount of butter, and press, butter side down, into a mini muffin tin. Drain and chop the artichokes roughly, then mix with the cheese, pepper, mayonnaise and lemon juice. Season with salt and pepper, then fill the tart shells. Bake for 15 minutes at 425'.
Be sure to let cool for 5-10 minutes before serving.


Artichoke Hearts with Kalamata Olive and Tomato Dressing
serves 2-4 people

2 cans artichoke hearts, drained
1/4 cup olive oil
1/4 of a medium tomato, seeded and diced
5 kalamata olives pitted and chopped
1 clove garlic chopped
1 tb red wine vinegar
pepper

Cut the hearts in half (or quarters if they are large) and place on your serving plate.
In a blender, food processor or with an immersion blender, combine the rest of the ingredients and blend until smooth. Spoon over the artichokes and serve


Artichoke and Parmesan Crostini

8 slices of baguette
1 clove garlic, cut in half
2 tb mayonnaise
1 small jar marinated artichoke hearts
4 tb grated parmesan cheese
pepper

Toast the baguette.
Put the garlic in a food processor and chop. Drain the artichokes, add to the processor and chop again. Add the mayo and cheese and pulse to combine.
Season with pepper to taste, and spread on the baguette slices.

Wednesday, October 18, 2006

Canadian Blogging By Post 2

Jasmine from Confessions of a Cardamom Addict is the lovely hostess of Canadian Blogging By Post 2 - Our Seasons Bounty.

While I am definitely not a winter/fall person, I'll admit I do love the big piles of squashes, beets, apples and corn at the markets this time of year. One food that always makes me think of fall is apples.

In the fall when I was a kid my mom would buy big bags of apples and make all sorts of treats - apple pie and apples cored and stuffed with brown sugar and nuts and then baked were two of my favorites. But my very favorite was her apple sauce. Saturday nights my mom would fill her crock pot with peeled apple slices sugar and spices and when I would wake up in the morning the house would smell so good. The sauce was thick and full of big apple pieces and dark brown from all the spice - nothing like the yellow pureed sauce you buy in the stores. Ah memories!

This is a newer favorite apple dish of ours. I hate to admit it, but this dessert makes me sort of glad the weather has cooled down a bit. Don't tell anyone!
Broiled Apple Parfait
makes 2 generous servings
2 apples peeled cored and thinly sliced
2 tb brown sugar
2 tb butter, melted
6 tb pure maple syrup
2 tb brandy
4 butter cookies roughly chopped or crumbled (I like Presidents Choice Dutch Butter Cookies)
Vanilla Ice Cream

Preheat broiler. Lay apple slices in a single layer on a baking pan. Sprinkle the brown sugar over the slices, then drizzle the butter over the top. Place under the broiler and cook until the sugar has melted and the apples are soft and starting to color, stirring once or twice. Remove from oven. Meanwhile, in a small saucepan or microwave safe bowl, mix the maple syrup and brandy together and heat until very warm.
Take half of the cookies and sprinkle them in the bottom of 2 bowls. Top each bowl with 1/4 of the apples. Scoop a small spoon of ice cream onto the apples and drizzle each with a spoonful of the brandied syrup. Repeat with the rest of the cookies and apples. Place another scoop of ice cream on top and another spoon or two of sauce.
Serve straight away.

Tuesday, October 17, 2006

Blog Party 15 - Literary Party

For Blog Party 15 Stephanie from Dispensing Happiness chose a literary theme, asking us to come up with some treats inspired by or from a novel.

At first I thought this would be a piece of cake. It was a lot harder than I thought! But finally I picked one of my favorite stories by one of my favorite authors, but probably most if not all of you won't have heard of him.

Stuart McLean is a Canadian author, journalist, teacher, radio host and performer. He is the author of many books including the popular Vinyl Cafe stories. He has a radio show on the CBC and also tours Canada. Scott and I have been lucky enough to see him twice in the past couple of years.

My favorite story of his is from his book Home From the Vinyl Cafe and is called "Dave Cooks the Turkey". It's also available as its own book and is on Stuart's Christmas Collection CD. It is a priceless, hysterical story; Dave decides to help out his wife Morley at Christmas by offering to prepare the turkey dinner while Morley takes their children to help at the Food Bank on Christmas Day. Dave does not realize until he goes to bed on Christmas Eve that preparing the turkey also means buying the turkey. What happens next...well, you really should read it yourself to find out.

In honor of Dave and because we Canadians had our Thanksgiving dinners on the 8th, I made Turkey Quesadillas.
Each quesadilla is cut into eight servings. For each quesadilla you'll need:
2 flour tortillas, 8 or 10" diameter
1/2 cup mozzarella cheese
2 tb cranberry sauce, plus more for serving **
2 green onions, chopped
2" piece of broccoli stem peeled and thinly sliced
1/4 cup leftover turkey meat, coarsely chopped

Spread 1 tb of cranberry sauce on each of the quesadillas. Top one with half the cheese, the onions, broccoli, and turkey. Sprinkle the rest of the cheese over and top with the other tortilla, cranberry sauce side down.
Heat a large pan over medium heat and spray lightly with non stick spray if desired. Place the quesadilla in the pan and cook until the bottom is lightly browned. Carefully flip the quesadilla over and cook until browned and the cheese has melted.
Remove to a cutting board and let stand 3 or 4 minutes before cutting. Cut the quesadilla in half, then cut each half into fourths. Serve with extra cranberry sauce on the side.

**I made my cranberry sauce from the recipe on the side of the cranberry bag but cut the sugar by half so it wasn't so sweet.

I have recently discovered Nutella; it is the best stuff on Earth. Where has it been all my life and why did no one tell me about it sooner? I whipped up a little chocolaty treat for the party - Nutella Tarts.
I filled baked mini tart shells with Nutella and whip cream blended together, then finished with a dollop of regular whip cream. These went fast let me tell you. I made 8 for 4 people and probably should have doubled it at least!

Our drink veered us close to Christmas territory what with the turkey and all. But the stores started selling Eggnog here earlier this month and my boss for some reason bought bottles for everyone at the office. We added rum to ours, but it's just as delicious plain with a sprinkle of nutmeg.

Monday, October 16, 2006

Spotlight On - Baking: From My Home To Yours

I am totally thrilled and excited to tell you about a project in the works.

My friends at Houghton Mifflin Publishing Company offered up 25 copies of their newly released book Baking: From My Home To Yours by the wonderful Dorie Greenspan.


I sent out the call to some fabulous bloggers who agreed to check out the book, cook a recipe or two and tell us all about it.

In a few weeks, after eveyones had their fun with the book, I'll have the round up posted both here and over at Weekend Cookbook Challenge. You'll be able to see what the bloggers from Canada, the US, Australia and Germany thought of this scrumptious work of deliciousness.

Cheers!

Thursday, October 12, 2006

Magnets

The delicious Poppy from Poppy Cedes recently chronicled her
magnet collection. Last night I pulled all the magnets off my fridge so I could do the same.

Top from left to right:
Koala Crossing magnet from Australia (gift - I have never been), a potato magnet from Prince Edward Island (never been there either) and a magnet from our trip to Las Vegas.
Middle:
sun wind chime from Australia, Prince of Wales Hotel magnet from Waterton, one from Tofino, BC.
Bottom:
Free with purchase magnet that doubles as a beer opener. Classy!
Top row:
I heart button I bought in San Francisco and turned into a magnet, a vase magnet, a magnet from my parents recent trip to Newfoundland.
Bottom:
A Shrimp magnet from the Bubba Gump Shrimp Company in San Francisco, a moose from Alaska (haven't been there either), a Mickey from Disneyland, and a waiter magnet. The waiter has magnets in his hands so you can pose him.
Top:
a turtle from Cayman Islands (haven't been there), double decker bus from England (nope, not there either), Golden Gate Bridge in SF.
Bottom:
Beware of Rattlesnakes magnet from B.C., another from Nova Scotia, and a glass lobster I bought at Millarville last year.

Well, obviously my magnet collection is much better traveled than I am!

So, what's holding up the junk on your fridge?

Tuesday, October 10, 2006

Monthly Mingle 5 - Take Two - Zucchini Saltimbocca

Meeta from the gorgeous blog What's For Lunch Honey hosts the Monthly Mingle, another great food event, and another one that I always miss out on. But not this month! This time around I was primed and ready to take part in Monthly Mingle 5 - Take Two in which Meeta gives us two ingredients to use in our dish.

Meeta chose sage and zucchini (squash) which thrilled me as I love both. AND I could use some delicious leaves off my lovely sage plant.

For Meeta's Monthly Mingle I made Saltimbocca of Zucchini:


I got the idea from a recipe on the food channel - you can see it here.
Our zucchini were quite large so we cut them into rounds instead of lengthwise. This was a super idea as it turned the saltimbocca's into little "sandwiches" that were easy to hold in your hand and eat.

I used mozzarella instead of fontina and didn't bother with exact amounts of ingredients. They came together in a snap and were a huge hit at dinner.

Thank you Meeta for hosting the Monthly Mingle. I enjoyed taking part this month and look forward to seeing what the next Mingle will bring.

Thursday, October 05, 2006

Weekend Cookbook Challenge #9 - Using An Ingredient from My Country/Region

Spicy Beef and Potato Curry from Meeta at What's For Lunch Honey?

The post for Weekend Cookbook Challenge #9 is now up, so go check it out if the mood strikes you.

WCC #10 will be hosted by Mary of The Sour Dough. Email a link to your post to her by Friday November 3. Mary's email is snddsn1 AT fmail.co.uk.


See you there!

Monday, October 02, 2006

Flatbread with Mint, Tomato and Halloum Cheese with too much information.

Two Saturdays ago I was in a funk. (This is the too much information part.) I spent the morning laying facedown on the couch, blocking out everything in the world but the sounds of The Food Channel. (I know! I think I was more depressed than I realized.) I resisted all of Scotts efforts to cheer me up or even to get me to move off the couch until Nigella came on. I perked right up when she made her Halloumi and Tomato Flatbread.

That's what I want for dinner, I announced. And so it was.According to my "The Complete Encyclopedia of Cheese" Halloum (the books version on the spelling) is a very popular cheese from South-East Europe. It is fairly firm in texture with a taste similar to feta which means salty. My book says it is not a cheese to be eaten on it's own, but is best for broiled or oven baked dishes.

Nigella grilled hers on the barbecue; her recipe is in her Forever Summer Cookbook.

This is my version. I don't think you need a recipe, just guidelines.

Flatbread with Mint Tomato and Halloum Cheese

For each flatbread you'll need

about 1 medium tomato, diced
2 or 3 pinches of dried mint
handful of halloum cheese, crumbled
flatbread of your choice.

Preheat your broiler. Place the flatbread on a baking sheet. Spread the tomato over the flatbread and sprinkle with the mint. Top with cheese and broil until the flatbread and cheese start to lightly brown. The cheese will not melt.
Serve straight away.